I created this site as a hobby project to teach myself more about how to create and manage my own
online presence, to learn more about the major changes in modern JavaScript (ex: promises), and to
become familiar with cloud technologies.
Other than domain name registration (which I set up through a separate registrar) everything you see on
this page is built and delivered using AWS CloudFormation, including:
Storage configured as basic web servers with public access
DNS zone and record management
CI/CD pipeline to automatically deploy changes to the site
The source for my CloudFormation template can be found on GitHub.
Home Environment Monitoring
After taking an introductory course to machine learning and using Tensorflow, it got me thinking
about the value of data, and interaction between IoT and scalable compute available in cloud
providers. I began to get interested in experimenting with using cheap sensors to gather lots of my
own data, upload it to the cloud, and do...something with a it.
Choosing the hardware
I decided on the Raspberry Pi platform as the basis for my experimenting, and opted for the
Raspberry Pi Zero W, which is the wireless version of the tiny Zero model and can be often
picked up for only $15.
I then began to look into the various sensors available for the Pi Zero and options for
connecting them. Most tutorials I found involved soldering components together, which was not
something I was interested in. Happily, I came across a solderless solution to
holds components together, and even an installation jig that was a perfect fit for Pi Zeros.
Once I settled on the board and how to connect sensors, I thought the first good sensor tests
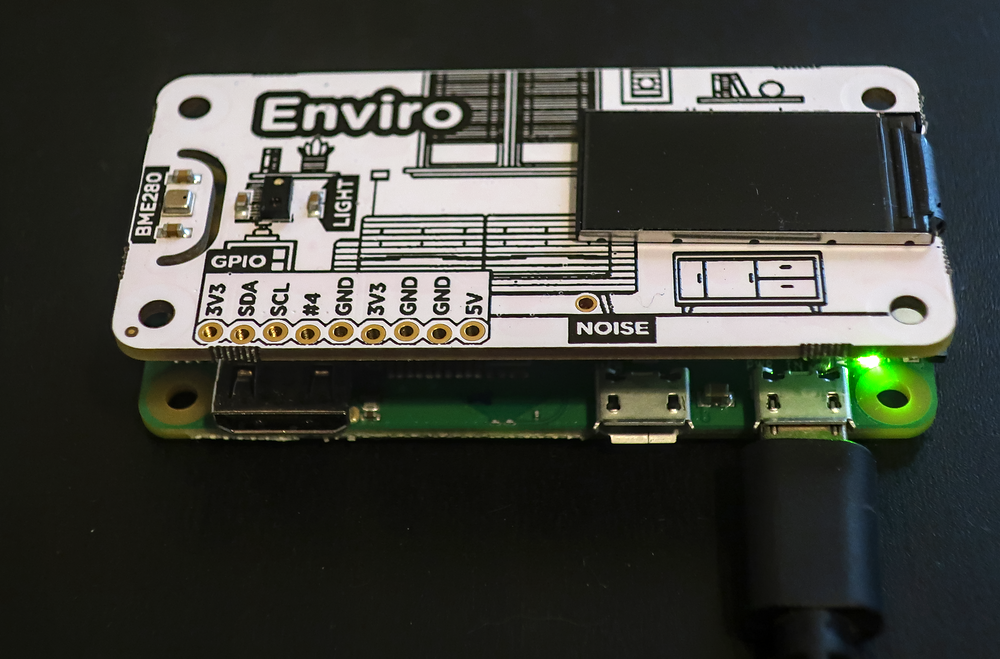
would be a camera and the Enviro
pHAT environment sensor board, so I picked up those as well.
After everything arrived, I felt that the discrete data from the Enviro pHAT would be simpler to
work with than the camera, so after I got the Pi running and Enviro pHAT attached, I began
experimenting with the Enviro pHAT's Python
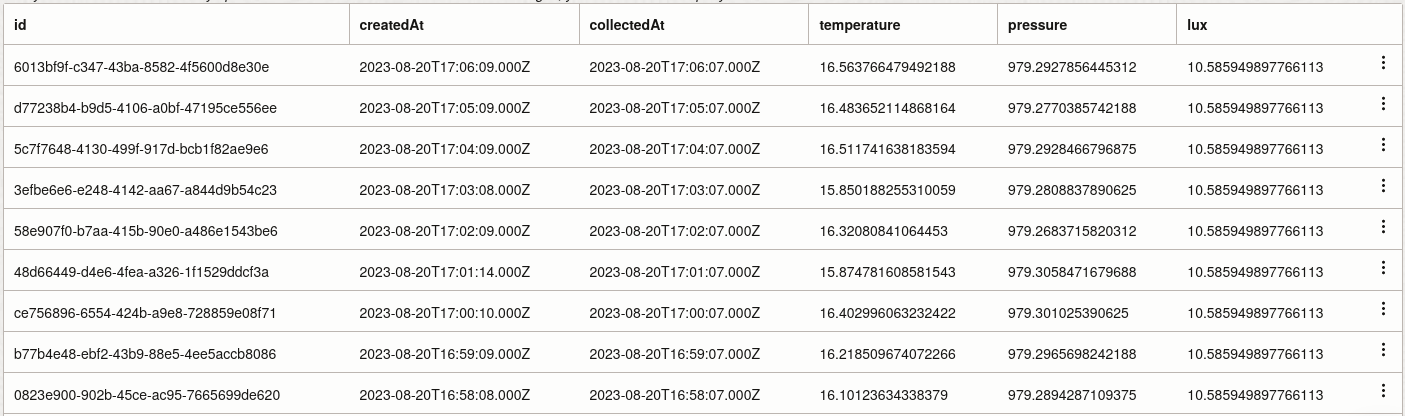
library to acquire data from its sensors, and from it was able to get a sense of what
values I wanted to keep, what to call them, and how to store them.
Raspberry Pi with solderless Enviro pHAT attachment.
Data storage
With an idea of what the data should look like, I then began to think about where to keep it. I
still wasn't sure what I wanted to do with the data, but if I could at least store it
somewhere, then I could work with it later when an idea strikes.
Remember, I wanted to explore the interaction between IoT and cloud services. Through a workplace
acquisition, I became an employee at Oracle, thought it would be a natural fit to use OCI for
this project.
I approached evaluating storage options for this environmental data the same way I did for this
website - I wanted something simple and cheap. Generally when someone looks up database options
in OCI, they usually see options such as Oracle Database (of course) and MySQL. For this purpose,
though, I also stumbled across an option that isn't widely advertised - Oracle's NoSQL database
for basic put and get operations.
With a database engine selected, I then had to figure out how to get data inside. The latest
trend seemed to be with serverless micro-services, and since all I needed was basic put and get
operations, developing them as serverless functions made sense. When it came to picking a runtime
for the functions, I didn't have experience with Node.js, Ruby, or Go, so to continue with
learning more about modern JavaScript, went with Node.
Once the Node functions were working on my machine, I started looking at how OCI actually deploys
serverless functions, which is built on the open source Fn Project, which works somewhat differently
than AWS's Lambda. Having prior experience with Lambda, OCI Functions took me a bit to wrap my
brain around. The key difference for me to understand was Lambda (and AWS Serverless Application Model [SAM])
is a 'walled garden' - pick your runtime, upload your source code, and Lambda handles creating, hosting,
and rolling out the container image for you.
The Fn Project on the other hand, is meant to be platform agnostic, and is therefore BYOC (Bring Your Own Container).
While this does allow for much greater flexibility, and the project does have runtime-specific base images and SDK 'hooks'
to ease development, it puts the ultimate onus for creating, hosting, and deploying the container image on the developer.
While the OCI Functions CLI can be used to build, upload, and deploy function images, invoking the CLI for
deployments from my PC or the cloud shell was still a chore - not the seamless CI/CD experience I wanted.
Therefore, I expanded on my previous experience with CI/CD pipeline creation in AWS and Jenkins, and
applied it to this problem as well. OCI has several Operations-oriented with a free usage tier, including:
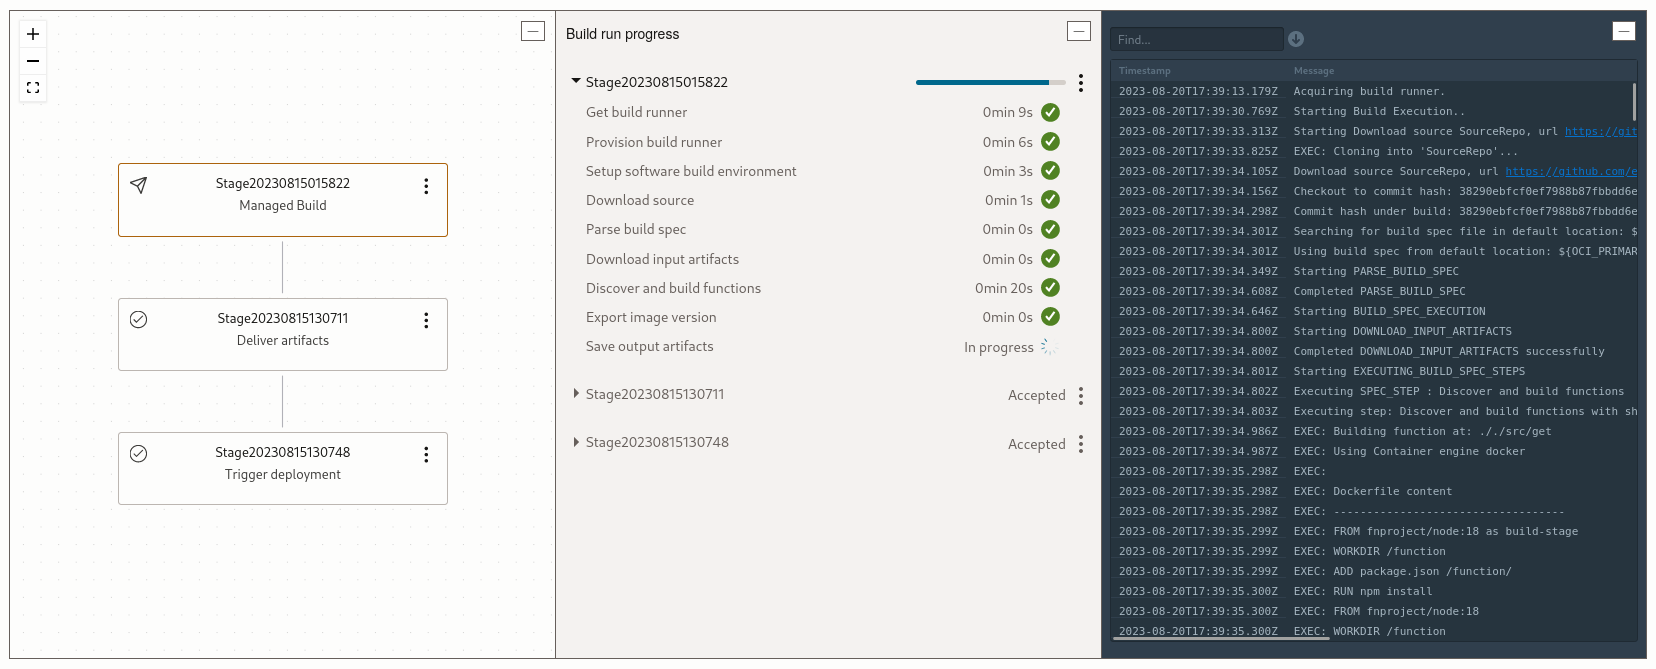
DevOps Build pipelines - executes the Fn commands to build the container images
Container Registries - stores the images after they're built
DevOps Deploy pipelines - pulls the images down and deploys them to pre-existing OCI Functions
Resource Manager - roughly equivalent to AWS CloudFormation, is a managed Terraform offering to track stack state
With these tools, I was able to create a Resource Manager stack that not only initially sets up the NoSQL database and OCI Functions,
but also manages the Build pipeline and container registry to build the first image (required to initially seed an OCI Function),
and the Deploy pipeline to automate function updates every time I push a commit - all in a declarative, source-controlled repo
of its own.
DevOps Build pipeline to prepare NodeJS functions
The source for my Fn-compatible NoSQL-backed 'put' and 'get' functions, and build specification for use in the Build pipeline,
can be found on GitHub.
Furthermore, the source for my Resource Manager Terraform module to create the pipeline, Functions environment, and database
can be found on GitHub as well.
Turning on the tap
With new pipeline to deploy and refine my NoSQL database schema and OCI Functions, I went back to my
Raspberry Pi to flesh out how to take the data from the Enviro pHAT Python library and send it
to the OCI Function. Most of the instructions I found online refer to calling Functions
through OCI's API Gateway, which sounded nice, until I saw how complicated authentication would be.
Again, trying to keep things simple and cheap. I had to figure out another way to authenticate to
this 'put' function from a Raspberry Pi without having to write my own authentication scheme.
Since only my Pi should be able to post data into my database, I expanded my Terraform module to handle creating a new IAM user,
group, and policy which only allowed invoking the 'put' Function. I then manually generated an authentication certificate
for that user, transferred it to my Pi, and in short order wired together the Enviro pHAT Python library and the OCI SDK for
Python to upload the data from the sensors into the NoSQL database through OCI Functions.
Success!
My Python code to capture sensor data and pass it to an OCI Function can be found on GitHub
Bringing it all together
After I got data flowing into NoSQL, I wondered - How could I graph this data? Using JavaScript to
display the graph on this web page seemed like a natural fit, but I had no graphing experience
in JavaScript and didn't know how I'd invoke the OCI function from an anonymous web page in
order to pull the data out.
OCI's API Gateway was very straightforward to set up, especially for anonymous access, so I once again
expanded my Terraform module to create an API gateway and link it to the 'get' Function that, in turn,
was wired to the NoSQL database where this sensor data was being stored.
Once I was able to anonymously pull back a sample of data from my Function into my browser,
I then experimented with a couple different JavaScript chart libraries.
Eventually I settled on the combination of Chart.js and the Luxon date/time libraries due to
Chart.js's support for having multiple y-axes, and Luxon's support for seamlessly presenting UTC
timestamps in the browser's local timezone.
The result is below:
Windows Package Management
A project at work involved rebuilding legacy Citrix images on a new version of Windows Server created
an opportunity for me to introduce a configuration management framework in our image build and
update processes. I took this opportunity to learn more about PowerShell Desired State Configuration
(DSC) as a means to manage these images (Chef on Windows wasn't quite where we needed it to be at
the time).
Getting to know DSC
I began exploring the use of the 'package' DSC resource, but found it very clumsy to work with.
It's expression in DSC configuration data didn't line up well how my team's engineers thought
about the layered software we manage on our images. I began searching for alternatives, and came
across another option - PowerShell
PackageManagement, which exposed both a series of PowerShell cmdlets and DSC resources
that could be used to both manage packages and package sources.
PackageManagement sounded like it might work well for my use case, so I began to investigate what
options it had to manage the complex collection of 3rd party software we required, when I
stumbled upon the ChocolateyGet package
provider module.
I already had some (very limited) past experience with Chocolatey as a package management tool,
but had not previously known that it could be managed through a PowerShell-based API, and being
able to manage Chocolatey packages and package sources via DSC intrigued me, so I began to
explore how I could leverage the ChocolateyGet provider to that end.
Updating ChocolateyGet
However, I encountered a huge initial roadblock, which was that while PackageManagement, as a
framework, supported package source management and installing packages from custom sources, the
ChocolateyGet provider did not. It was hard-coded to use the Chocolatey.org public community
repository, and there were no plans by the module maintainer to add custom source support
anytime soon.
Here was this module that did almost everything I needed - I was so close! So I decided
to fork the module and make it my own.
This was my first real attempt at taking an open source project and trying to contribute to it,
so I worked pretty diligently to leave the existing functionality and structure of the code base
as-is and just add the missing features I needed to manage Chocolatey sources through DSC.
After a while, I finally got the provider managing, searching, and installing across sources in a
way that was idiomatic to both PackageManagement and Chocolatey, and began to use it with DSC in
real environments. However, that real-world use uncovered several other smaller problems after
that, among which included:
faulty error propagation
package parameters not working with DSC
inability to dynamically 'upgrade' an installed package to the latest version
slow performance when downloading packages with embedded installers
large sections of duplicated (and sometimes confusing) logic that made code maintenance
tedious and
error-prone
The finished product
Working through these additional blockers and eventually using my modified version of the
provider, we were able to successfully roll out a DSC-based framework for building and upgrading
the Citrix images at work, and used that framework for a couple years (until we switched to
Chef). Furthermore, I was really happy
in general with how the provider worked, and thought would work well for other system
administrators, too.
Since there hadn't been much activity on the ChocolateyGet project, I reached out to the module
maintainer about being a project contributor and merged in my changes, which I later followed up
with:
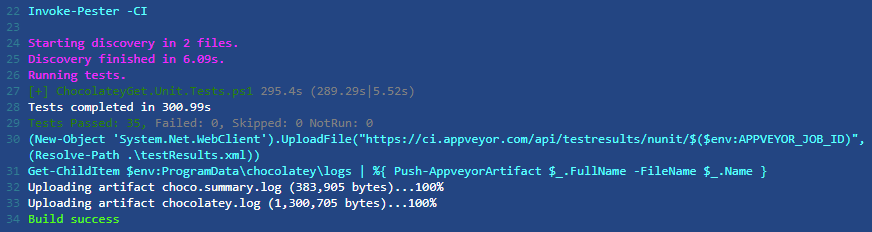
a major refactor of the module to deduplicate logic and improve readability
updating the CI/CD pipeline with better tests and automatic publishing
After having effectively rewritten the module from the ground up, I've effectively become the
primary maintainer of the ChocolateyGet project, and continue to review any issues or
contributions from the
community.
ChocolateyGet can be installed via
PowerShell Gallery.
Along comes WinGet
When Microsoft announced their new native Windows package manager
WinGet in May 2020
without an accompanying native PowerShell module,
I saw a need in the community that I could help quickly address by
taking the work I'd already done on ChocolateyGet to abstract and express package and repository
management concepts, and adapting it to WinGet. Within a day of WinGet's announcement, I
released a basic PackageManagement module to the community, though the underlying CLI it
interacted with had several quirks and didn't work very well.
Unfortunately, further development, including reworking the CLI interaction into a PowerShell
Crescendo module, was impeded due to it being practically impossible to install the CLI on any version of
Windows Server at the time, thus ruling out any opportunity for automated testing.
It wasn't until about a year and a half later, after WinGet itself had matured somewhat and
Windows Server 2022 (the first version of Server WinGet could even technically run on) runners
became available with GitHub Actions, that I revisited the project. After much trail and error,
I was able to automate the installation of WinGet onto a clean instance of either Windows Server or
Windows 11 Sandbox, which I could then use to begin iterating on a Crescendo module.
Other than automating the installation of WinGet, the other major difficulty was with parsing the
output of it's CLI. A list of packages could only be expressed in a columnar table format with
both dynamic columns and widths, which meant the only way to parse the
output (when it wasn't getting truncated by the CLI itself)
was to calculate string lengths based on column headings with several different localization options.